This year’s Easter was spent in quarantine. It was an excellent opportunity to take advantage of the sunshine and draw pictures with light. To swap the sterile electronic world of digital cameras for a bit of splashing around, and in our minds travel back to the 1830s, to the birth of photography.
A bit of photo history
William Henry Fox Talbot was an English traveler and polymath in the early 19th century. He wanted to capture what he saw during his journeys, but he was a poor draftsman. At that time, people used the camera obscura to draw lifelike views. Essentially, it was a large dark box with a tiny hole on one side. The light streaming in through the hole projected the image of the scenery in front of it onto the opposite wall of the box. Although the resulting image was upside down and reversed left-to-right, it was perfectly usable for tracing the lines onto a sheet of paper. The device itself had been known for a thousand years and had been popular since the Renaissance.
For Talbot, however, this was not a satisfactory solution. He did not want to fuss with a pencil in the half-light; he wanted the rays of light themselves to do the drawing. His brilliant insight was that if he placed light-sensitive paper into the camera obscura, the image would record itself, without any need for sketching. But at that time, sensitive photographic materials did not yet exist, although it was already known that some compounds changed their properties when exposed to light. Talbot experimented with silver salts, creating what was called salted paper.
On modern photographic films, silver salts are embedded in a gelatin emulsion, and there may be as many as 8–12 layers. Talbot’s salted paper, however, had no emulsion at all; the salt crystals clung to the paper fibers without any binder. At first he used silver chloride, but later he discovered that silver iodide paper was more sensitive. Just before taking a picture, he further increased the sensitivity by treating the paper with a mixture of silver nitrate, acetic acid, and gallic acid. With such paper, exposures of a few minutes were possible. After the exposure, the picture had to be developed in gallic acid and silver nitrate, then fixed with sodium thiosulfate. Talbot initially used a concentrated salt solution as a fixer, but it proved unreliable, so he switched to sodium thiosulfate—which has remained in use ever since as “fixing salt.”
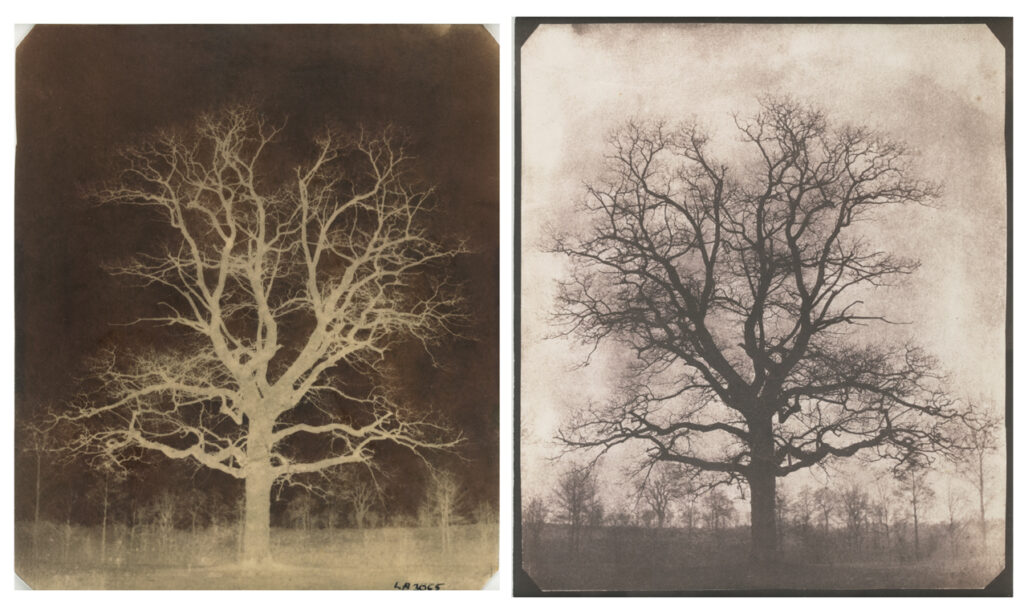
Such images, the so-called talbotypes, were negatives: the picture turned dark where the subject was bright, and conversely, where the scene was dark, the picture came out lighter. If another sheet of salted paper was placed on top of the negative, and the sandwich was exposed to light, the image reversed again, producing a positive copy. It was common to exhibit the negative side by side with the positive. Under magnification, the silver grains can be seen on these images, and the paper fibers are clearly visible even on the positive copy. For this reason, the image was blurrier and grainier than the daguerreotypes that appeared a little later.
Talbotypes were used mainly in England and France, especially for landscapes and architectural photography, but Niépce’s and Daguerre’s methods soon displaced them. Nevertheless, salted paper reappeared later as a medium for making positive prints with more modern processes. To prevent the sensitizing solution from soaking too deeply into the paper—something that would have reduced the image contrast—the paper was usually sized in some way. Starch, gelatin, or casein were used for sizing.
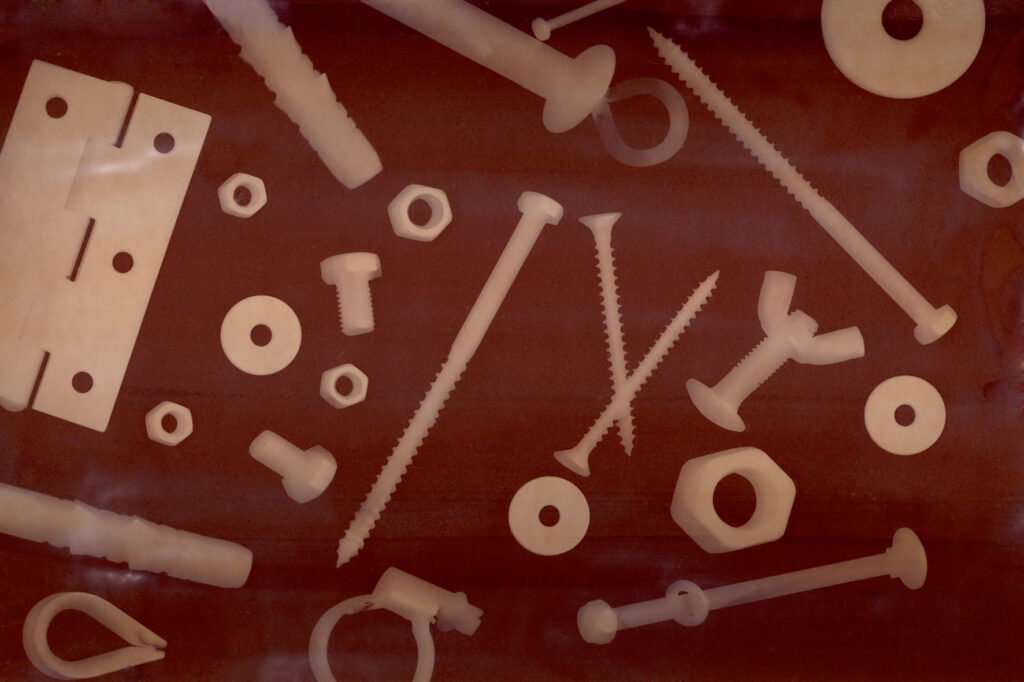
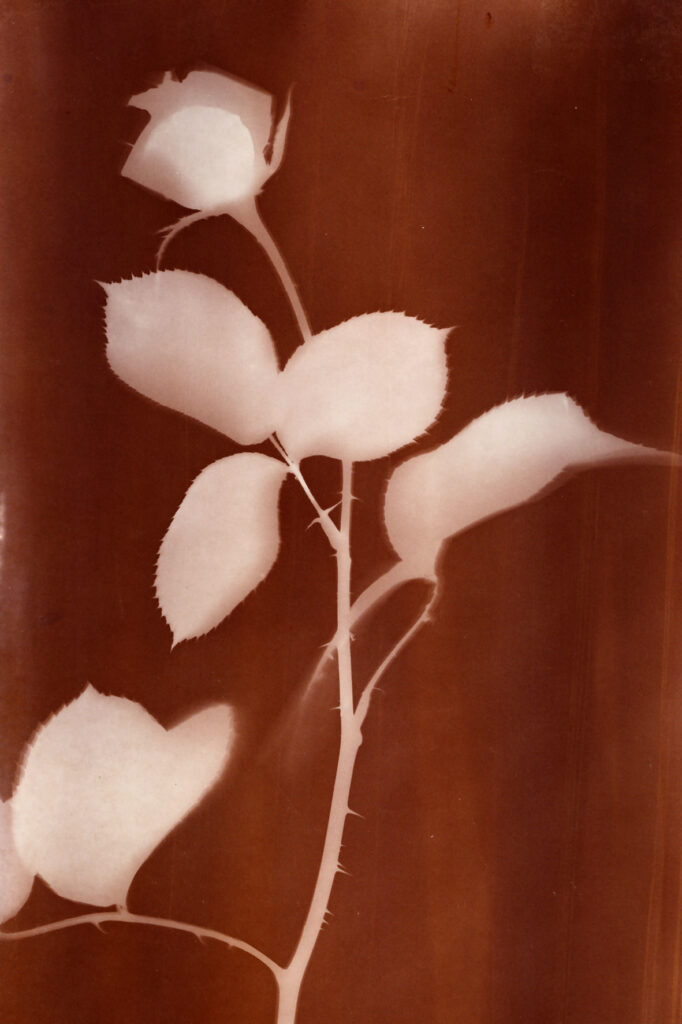
The sensitized silver-iodide paper, as Talbot had envisioned, could record the image formed inside the camera obscura. If a magnifying lens was installed in place of the pinhole, it gathered much more light, thereby reducing the required exposure time. However, the first silver-chloride papers were not so sensitive, so at first Talbot did not even use a camera. Instead, he simply placed objects such as plants directly onto a sensitized sheet, set it out in the sun, and let the plant’s shadow photograph itself. This is the method we, too, will now follow.
Let’s Make Salted Paper!
We will need suitable paper, silver nitrate, table salt, and fixing salt. We can skip the pre-coating the paper with glue if we choose photopaper made for inkjet printers. These have a waterproof, microporous ink-receiving coating that also works well for absorbing the silver salt solution. In fact, the cheaper photo papers are better for our purpose, since all premium-quality papers are coated with an ultraviolet-protection layer that prevents printer inks from fading—but in our case, it reduces the sensitivity of the salted paper.
If you check the paper under a banknote inspection lamp, you’ll see the difference: with UV-protected papers, only the back side glows, not the front, whereas the cheaper paper we need shines equally on both sides under the UV lamp.
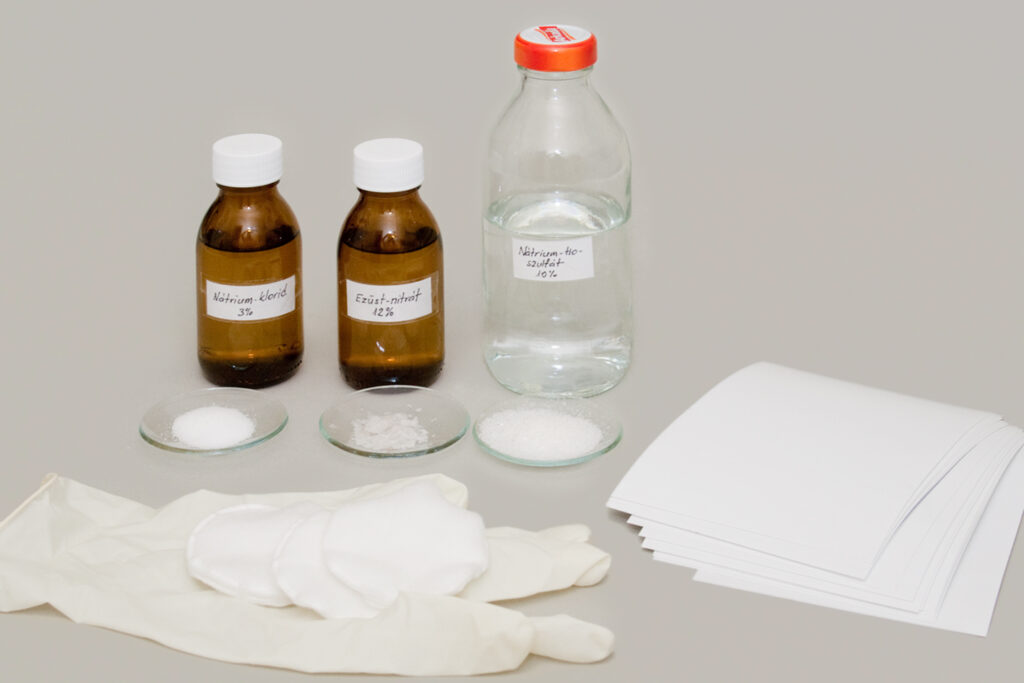
Preparing the Solutions
Make a 3% solution from table salt (sodium chloride) by dissolving 3 grams of salt in 100 ml of distilled water. Technically, it should be 97 grams, but we won’t bother about small differences—it’s much more important to use distilled water, not tap water.
For the silver nitrate, use a solution four times as concentrated as the salt one, i.e. 12%. This substance is available in pharmacies by prescription, so it’s best to ask for it already prepared as a solution. About 50 ml of 12% solution will be plenty.
Always wear disposable rubber gloves and safety glasses when working with silver nitrate! Not only because it is toxic (causing nausea, dizziness, diarrhea, and slight skin burns), but above all because it stains mercilessly. Whatever it touches, it leaves an indelible blackish-brown mark. If it stains your hand, don’t try to wash it off—you won’t succeed without injuring your skin. Be patient; it will wear off in a week or two. Also, take care not to scatter even tiny crystals around your home, as they can cause very unpleasant surprises.
Fixing salt, i.e. sodium thiosulfate, used to be a common item in photo supply stores, but it’s now rarely seen, since digital photography doesn’t require it. It is still available in pharmacies without prescription, though usually not in stock, only by order. It’s also useful as a stain remover, so there’s no harm in buying more than you need. For fixing the image, prepare a 25–30% solution.
Making the Salted Paper
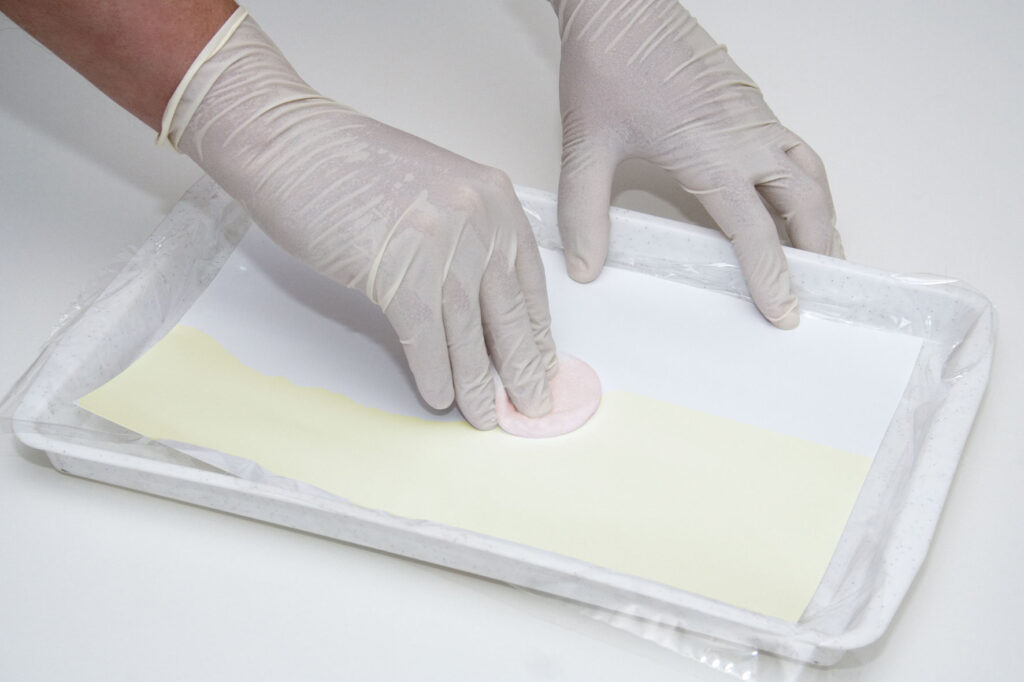
Once the solutions are ready, we can prepare the salted paper. Place the inkjet printer paper into a cheap plastic kitchen tray, coated side facing up. First apply the salt solution to this surface, and let it dry. For applying, you can use a soft wide brush or a roller, but I’ve found that cosmetic cotton pads work best. Dipped in the solution and gently squeezed, they allow you to spread the chemical in a nice even layer, leave no fibers behind, and can simply be discarded afterwards.
When the paper is dry, apply the silver nitrate solution in the same way. It is very important to spread it evenly in a thin coat, not too wet, otherwise the picture will come out blotchy. The paper first turns pale yellow, which makes the work easier, since you can see where the chemical has been applied. From the reaction between the previously applied sodium chloride and the silver nitrate, silver chloride precipitate is formed, which makes the paper light-sensitive. Since silver chloride does not dissolve in water, the only way to introduce it into the paper is to produce it directly there.
Apply the silver nitrate only under dim light. You don’t need a darkroom lamp, but don’t use more than a 40-watt bulb. Leave the sensitized paper in the tray and place it in a dark drawer to dry. It is important that it dries thoroughly, otherwise it will remain sticky. A few hours are enough for drying. Ideally, use the sheet right away; do not store it for more than a day.
The Ray of Light Draws
The subject to be photographed can be a few pressed leaves or small plants, or perhaps a composition assembled from various objects. Place them directly onto the paper and put it out in full sunlight to expose. On cloudy days the shadows are blurred rather than sharp, so it is better to work in bright sunshine and clear weather. The best time is around 11 a.m. to 2 p.m., when ultraviolet radiation is strongest and the sun is highest in the sky. If you tilt the tray by about 20–30 degrees, the sun’s rays will strike the sheet almost perpendicularly. A full exposure takes 5–10 minutes. If the paper is covered with a glass plate, the time may be several times longer, since glass can absorb ultraviolet light. Watch closely as the picture emerges! With a small release of chlorine gas, the silver chloride slowly decomposes and metallic silver is deposited. The uncovered parts of the paper darken, shifting from a faint light brown base tone into a deep violet-brown. Once it is dark enough, the exposure is complete and it’s time to fix the image.
With Talbot’s later silver-iodide paper and with modern photographic materials, not all the silver is released during exposure; only microscopic crystal nuclei are formed. Nothing of this can be seen on the film or paper—the image is still latent. The developer solution causes the silver grains to grow, transforming the latent image into a visible one. With our method, the negative image appears immediately, so no developer is needed—but for the same reason our salted paper is rather insensitive.
When the photograph is ready, fill a larger tray with clean water and wash the paper in it for 2 minutes.
In another tray, pour the fixing salt solution and soak the photo in it for 10 minutes. The sodium thiosulfate forms a soluble complex with the residual silver chloride in the paper, allowing it to be washed out.
Then transfer the sheet into a tray of clean water and wash it for 20–30 minutes. Gently agitate it, or let a thin stream of water trickle over it from the tap.
Perfect fixing and thorough washing are very important for the durability of the image! If the silver salt were not washed out, it would eventually decompose on its own, blackening the entire sheet evenly and causing the image to disappear. Washing also removes the fixing salt, which would otherwise leave yellowish-brown stains on the paper.
The Egg Camera
Our salted paper cannot be loaded into a camera or pinhole camera. It is simply far too insensitive—so much so that even with a fast, high-quality lens, one would need to expose it for years before any image appeared. This is why Talbot at first resorted to direct sunlight and placed objects directly onto the paper. That method has remained in use to this day. In the 1970s and 1980s, photograms became popular again, created in essentially the same way, but using modern photographic papers and exposing them in the darkroom with the enlarger’s lamp.
The latest trend is to place various objects on a flatbed scanner, scan them, and then compose an artwork from the resulting fragments in Photoshop. This scanner-based method is used, for example, by Florida artist Maggie Taylor. You can get a taste of her surreal images on her website: www.maggietaylor.com.
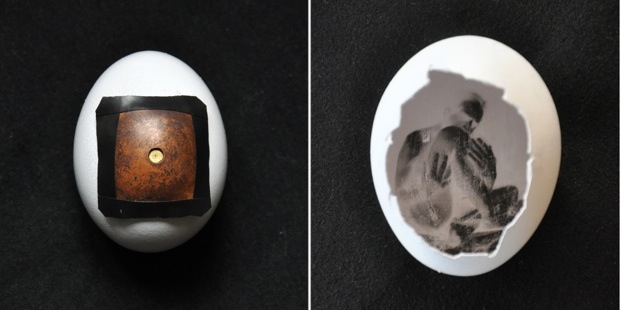
If we want to work with a pinhole camera, we’ll need more sensitive commercial emulsions (e.g. FORMASPEED). Francesco Capponi wrote a wonderful Easter tip about this some years ago on www.lomography.com. He created a pinhole camera, which he called the Pinhegg, out of an eggshell: after emptying the egg, he coated the inside of the shell with photo emulsion, then attached a small plate with a suitable pinhole onto the shell. His article describes the process in detail—I’ll include one of his pictures: