Every day, dozens of tiny, invisible instruments rise above our heads. Weather radiosondes that collect data from the lower and upper layers of the atmosphere, then a few hours later quietly disappear somewhere above fields, forests, and villages. The signals from these sondes can be received by anyone — and that’s where the exciting world of radiosonde hunting begins, attracting radio amateurs, technically minded people, and curious lay readers alike.
What are meteorological sondes used for?
A meteorological radiosonde is one of the most important tools of modern weather forecasting. The instruments are lifted by a helium- or hydrogen-filled balloon. They pass through the troposphere, where most weather phenomena take place, and rise into the stratosphere, while continuously measuring temperature, air pressure, humidity, and wind conditions. These data are transmitted back to the ground in real time by radio and form the basis of weather models.
Radiosondes intended for military use are often programmed to remain silent for most of the flight, and only transmit—often with encrypted data—once they reach a certain altitude or after a specified amount of time has elapsed. The data from civilian meteorological sondes is completely public; in fact, some manufacturers (e.g., Vaisala) publish very detailed specifications for radiosonde hunters.
From roughly 800–900 locations around the world, radiosondes are typically launched twice per day, because the data obtained this way are essential for accurate weather forecasting. In the past they were launched by hand, but today many sites use automated launchers. In Hungary, balloons are launched twice a day from Pestszentlőrinc and Szeged at 00 and 12 UTC. In addition, in extreme weather (such as thunderstorms, freezing rain, or snowfall), extra launches may be made outside the regular schedule. These “forecast‑improving” launches are typically made at 06 and 18 UTC.

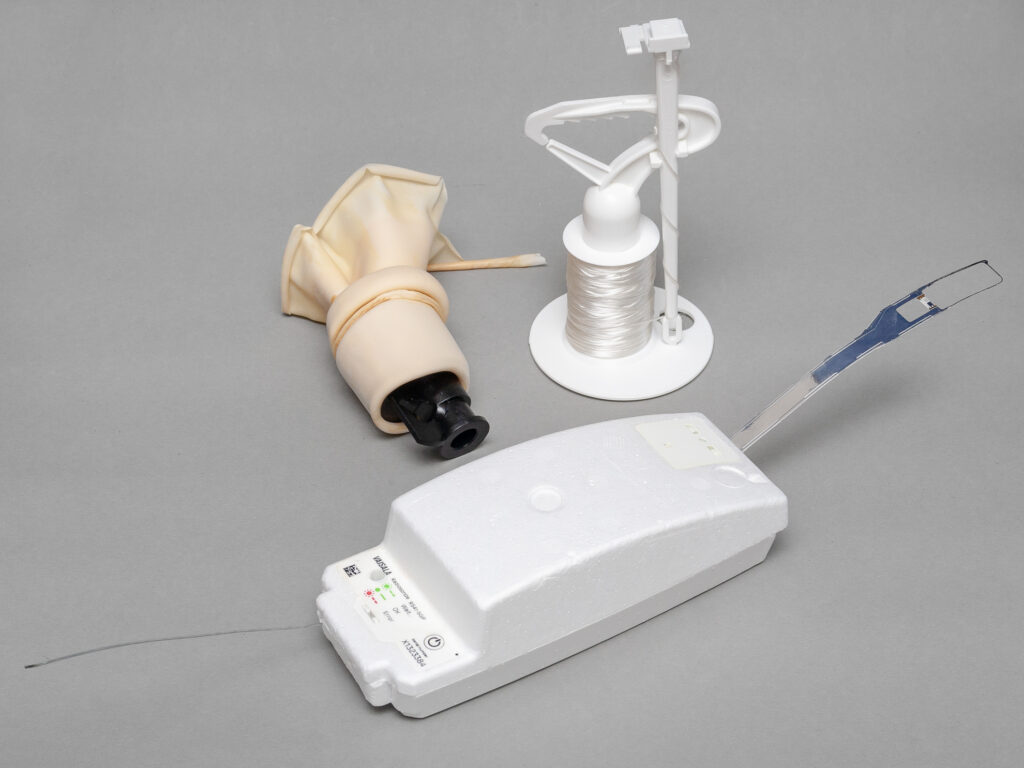
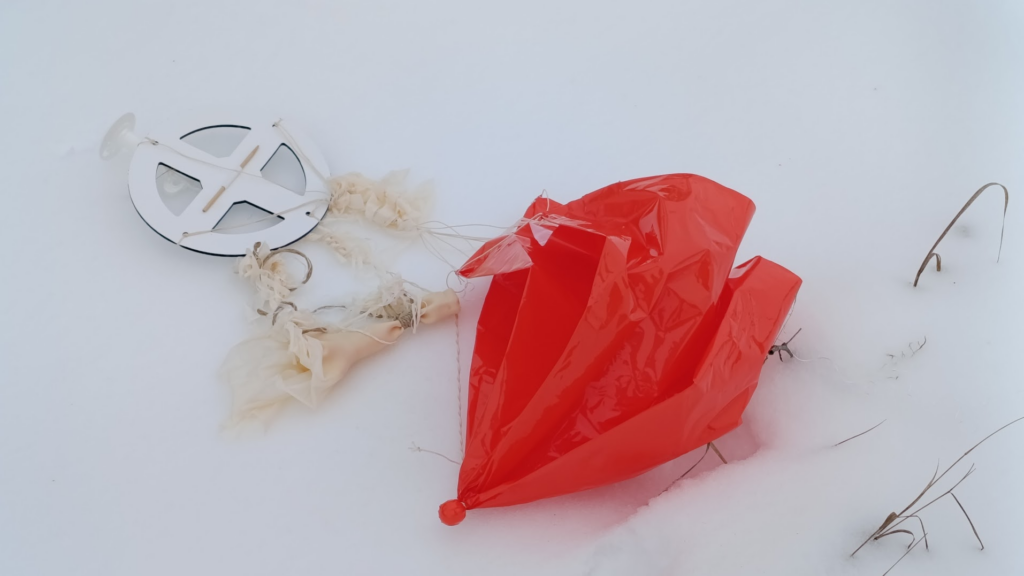
A typical radiosonde consists of three main parts:
- Balloon – initially 1–2 meters in diameter; in thinning air it expands to a huge size until it finally bursts.
- Sensor unit, radio transmitter and GPS – uses sensors to measure atmospheric parameters and transmits the measured data and position to the ground.
- Parachute for the return – many systems use one to slow the fall and increase the chance of finding it intact, but details vary by type/operator.
Balloons typically fly for about 1.5–2.5 hours and, depending on balloon size and sonde type, climb at roughly 5–6 m/s to an altitude of 20–35 km (airliners cruise around 10 km, so balloons rise two to three times higher). Up there it is very cold (as low as –60…–70 °C), so the instrument needs internal heating and thermal insulation in order to operate (some sondes have heater elements; others rely on insulation and the electronics’ own heat dissipation). The temperature sensor and humidity sensor sit outside the insulated housing on a small “arm” so they measure the ambient air. The sonde is tied to the balloon with a long string (typically about 30–55 m, depending on type), which during ascent usually unwinds from a spool so turbulence generated by the rising balloon does not disturb the measurements.
The balloon keeps rising until it bursts in the thin air. Its horizontal motion is always caused by the wind blowing at the given altitude. In Central Europe, in winter balloons often drift strongly eastward, mainly due to the jet stream (polar jet) meandering around the entire Earth near the top of the troposphere, around the tropopause (8–12 km). Its speed can reach 400 km/h, and at our latitude it is more typical in winter and during strong weather fronts, while in summer it shifts farther north. Winds above the jet stream can also change seasonally: in winter, westerly and stronger winds dominate there too, while in summer milder and at times easterly winds can prevail. That is why, for example, sondes launched from Budapest in winter may fall in the Southern Great Plain, Hortobágy, Nyírség, or even Romania, while in summer they mostly land within Pest County.
The Austrians, for example, have recently been launching cheaper and smaller (according to the manufacturer, more environmentally friendly) Meteomodem M20 sondes from Vienna. In winter there is a chance of finding them anywhere in the country; in summer mainly in the north‑west of Hungary. In Transdanubia you can also catch those launched from Graz and sometimes Linz or Zagreb. The Slovaks sometimes launch German Graw DFM09 sondes from the Záhorie Military Technical and Testing Institute, but these only occasionally make it as far as the Hungarian Central Mountains. It is a rare event for a sonde from Ljubljana or from Prostějov/Prague in the Czech Republic, or from Munich, to reach Hungary — but there has even been an example of an Italian sonde flying across the whole country and landing in Slovakia near Levice.
When the sonde reaches the burst altitude, the balloon pops dramatically and the latex splits into shreds and long strips. Sometimes it disperses completely and only a thicker piece at the filling neck remains (a small, fist‑sized bundle); other times the whole (typically 350–550 g) latex remains in one piece and lands near the sonde. At first, the fall is very fast in the thin atmosphere (40–60 m/s), then it slows down upon reaching denser air (down to 10–20 m/s), depending on how much of the balloon remains and whether there is a parachute. In the past, parachutes were always used; today, very small and light sondes are not always fitted with one.
During descent the instrument continues to transmit data, and it may even keep transmitting for hours after reaching the ground (for example Vaisala RS-41-SG units transmit for hours from popping, in my experience Vienna M20s for 5–6 hours, but this depends greatly on type and configuration). Based on GPS data, sometimes it is possible to track the fall down to 30–50 m altitude, and then you can find it at the indicated location much like a geocache.
UHF/VHF radio propagation is similar to light: for reception, the receiver must “see” the transmitter. While the sonde is high up it can be received from very far away (up to ~350 km); when it gets close to the ground, terrain and buildings quickly “bite off” the range. While it is in the sky there is no problem: signals can be received from several hundred kilometers away. The theoretical radio horizon (also accounting for atmospheric refraction) is
where D is the distance in kilometers and hT and hR are the heights of the transmit and receive antennas above ground in meters. If the sonde is at 30 km altitude, in theory you could receive it from 700 km away, but due to antenna gain, signal‑to‑noise ratio, and the low elevation angle (terrain masking), in practice it is closer to around 350 km.
Note: To find the required transmitter height when the receiver is at ground level (hR ≈ 0 m), you simply rearrange the standard radio horizon equation. Given a distance (D) in kilometers, the required transmitter/balloon height (hT) in meters is:
For example: For example, the distance between Vienna and Budapest is 214 km → hT ⪆ 2700 m for receiving the radiosonde taking off.
Although the meteorological service stations (with antennas near the launch site) receive the transmission from the start, in my experience amateur stations only begin to receive the signals about 15 minutes after launch and then share them online. As the sonde falls, distant stations lose it from view (terrain‑dependent) at 200–1500 m altitude because the Earth’s curvature and mountains block the path. A landed sonde’s signal is usually only receivable from 0.5–1.5 km away. If it fell among buildings, into dense vegetation, snow, mud, or water, the distance is even smaller — often barely more than a hundred meters. Sondes float on water, and even a sonde that fell into water can still be received from a few hundred meters away.

Where can you track the sondes online?
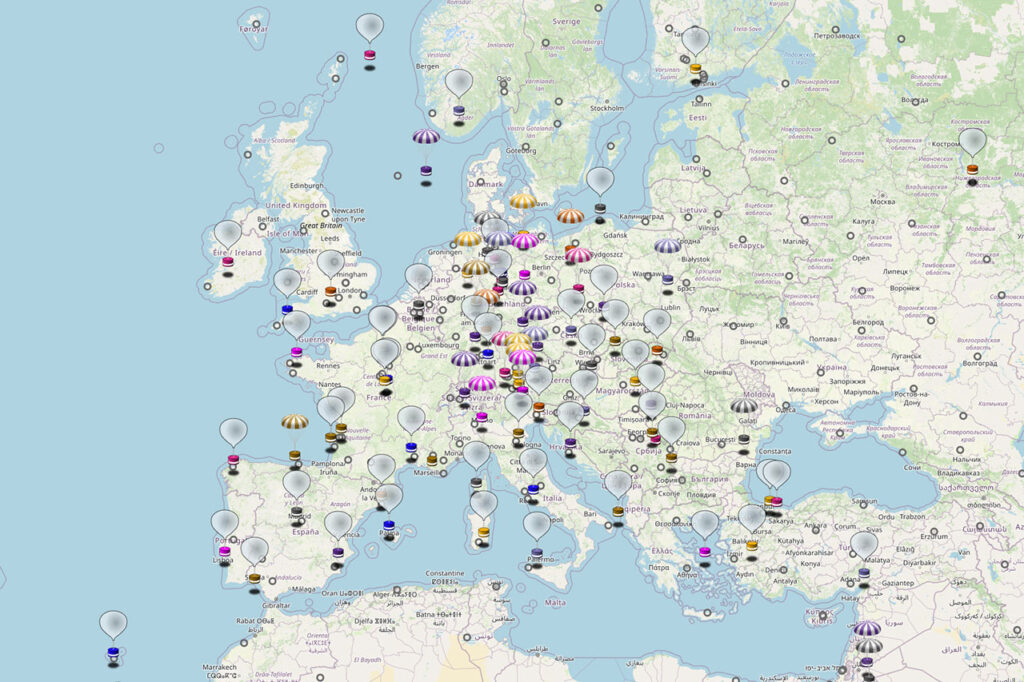
One of the most convenient parts of radiosonde hunting is pre‑planning: today several community‑data‑based trackers show where the sondes are.
- SondeHub Tracker – live and historical tracking, map view, often with prediction.
- radiosondy.info (SQ6KXY Radiosonde Tracker Database) – “Now flying”, “Planned” and prediction views; a practical aggregator page.
- Local/regional sites and groups – often with frequency tips, reception reports, and “where it’s heading now” type info.
With these you can quickly decide whether it is worth going after a given launch, and where the expected landing zone is.
Based on current trends, the international radiosonde‑hunting scene is sharply split between technical developer communities (GitHub, Discord) and forums/groups that bring together field hunters. Here are the most important community hubs in the USA and Europe:
United States (USA)
- Radiosonde Central (Groups.io) – The most important professional mailing list in the USA. After registering you can access the archive, which contains decades of experience with American‑type sondes.
- Reddit – r/radiosonde – The most active English‑language community, mainly with field photos and software questions.
Europe
- Radiosondy.info – Poland‑centered but also available in English. Not just a tracker: this is the “center” of European hunting. Their forum and leaderboards are among the most influential on the continent.
- UKHAS (United Kingdom High Altitude Society) – The Wiki section is the most valuable part. Community activity happens at Groups.google.com/g/ukhas.
- Radiosonde.eu – More of an archive and technical description collection (French and English), but for identifying sonde types this is the best source in the world.
Global technical hubs (software & development)
If you’re interested in the technical background (how to decode the signal), focus on these:
- Project Horus Discord – The most authentic. This is where you’ll find the developers who write much of the tracking software used today (auto_rx, SondeHub). Invite‑only; access is possible only after an invitation.
- GitHub – Universal Radio Hacker (URH) or the Radiosonde_auto_rx GitHub page. Under the “Discussions” or “Issues” tabs you’ll find the deep technical discussions, for example when a new sonde type (such as newer Chinese or Russian models) needs to be reverse‑engineered.
over the Sopron–Lake Neusiedl region.
How can you receive a radiosonde signal?
The entry barrier is genuinely low: for listening you can even use a simple UHF receiver; a basic handheld radio with a rubber‑duck antenna is enough. Oddly, an inexpensive Chinese walkie‑talkie (for example the Quansheng UV-K5, which you can buy for roughly the price of two or three big hamburgers and which can also do airband AM) is often more suitable than more expensive amateur handheld radios. The latter are more precise devices, and their input band‑pass filters are tuned for 430–440 MHz, so they strongly attenuate sonde signals transmitted at 400–406 MHz. Chinese walkie‑talkies, however, are wideband (400–470 MHz).
On the radio, a sonde signal sounds like a characteristic choppy, whistling, rattly tone that is often typical of the given sonde type and easy to recognize.
Important: the frequencies in use may vary by country and launch station, so the simplest approach is to check the specific values for that day on tracker sites / in local communities.
How can you decode a radiosonde signal?
Surprisingly, this isn’t hard either. Sondes usually transmit unencrypted signals, so the data are accessible to anyone. This is a deliberate choice: the goal is data collection, not hiding. What you need:
Hardware
- RTL‑SDR receiver – an inexpensive USB software‑defined radio that typically covers the required band around 400–406 MHz.
- Antenna – a simple quarter‑wave (or GP/J‑pole) works; for direction finding a Yagi/Moxon type antenna is convenient.
- Low‑noise amplifier (LNA) – optional; it can help with long cables or a weak antenna, but with a good outdoor antenna it is often unnecessary (e.g. TQP3M9037)
Software
- Receiver software (waterfall/spectrum): for example SDR#, SDR++ – with these you can find the signal and tune it in reliably. For beginners on using the SDR receiver and software: Quick Start Guide.
- Decoding and mapping:
- radiosonde_auto_rx – automatic scanning/reception/decoding (popular on Linux, including Raspberry Pi).
- SondeMonitor – decodes multiple sonde types with map display (Windows).
I recommend SDRangel, which is an “all‑in‑one” solution: a panoramic receiver with a built‑in radiosonde decoder. It’s free and has Windows, macOS, Linux, and Android versions.
The point is: the radio signal becomes a digital data stream, and from that the numbers come together — temperature profile, pressure, humidity, altitude, speed, and GPS position — which gives you the “treasure map” in the field.
Why is it fun to “hunt” them?
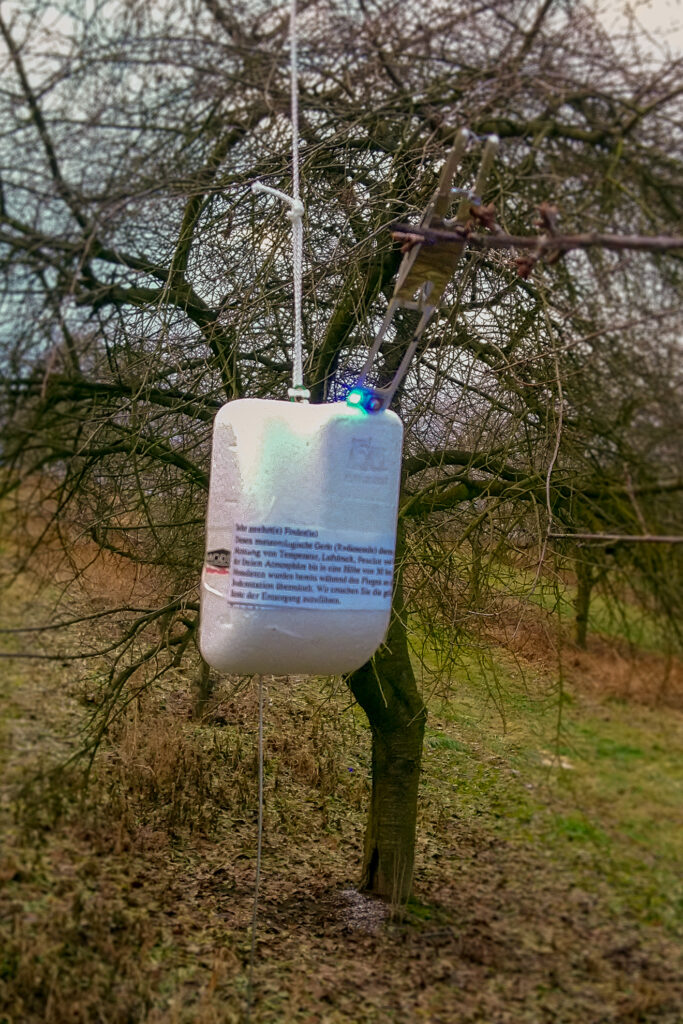
For many people, the essence of radiosonde hunting is the physical recovery of the sonde — in that sense it really is similar to geocaching. Most radiosondes are disposable devices. In many places there is no organized recovery program: if you find one, it is usually up to you whether you keep it as a souvenir, donate it (e.g. to a school), or dispose of it responsibly. Always read the label/tag on the sonde: if it contains return instructions, it’s polite to follow them. In Hungary, HungaroMet does not ask for them back. If someone finds them, they can take them home without worries. In the past they had to be returned and a nominal fee was paid for them.
Here, receiving and decoding the radio signal is primarily a means to an end: it allows you to estimate the expected landing area, then you can head out with a map and GPS to search. When you finally find a device hanging from a tree at the edge of a field or in a forest belt, or you walk kilometers for it across a muddy plowed field, or you try to row into the wind with a borrowed boat on a fishpond using a broken oar — the experience is both treasure hunting and technical success, and a tangible keepsake.
Why look for them?
- Geocaching vibes, but with a real object. In the end, the “treasure” really is there, hanging from a tree, in a bush, or in the middle of a stubble field.
- A technical challenge you can learn quickly. With a bit of preparation (tracking → route → terrain), even the first try can be a success.
- A curiosity trophy. A radiosonde looks at first like it fell out of a sci‑fi set — visitors will ask about it.
- Reusable parts. Many people salvage parts for antenna experiments, GPS projects, and DIY gadgets. Some revive the device and reprogram it, for which alternative firmware exists on GitHub. Radio amateurs turn them into beacons, fox‑hunting transmitters, garden weather stations, etc.
- You get to know your area, too. Dirt roads, forest belts, canals, fences — in real life there’s always an extra “twist” the map doesn’t show.
⚠️ Important: it is forbidden to operate the sonde on its original frequency! The 400–406 MHz interval is allocated for meteorological stations.
You can reprogram the frequency to another band, but operating a transmitter of this power on other frequencies also requires a transmitting license. On the 70 cm amateur band you can play with it while following the rules and holding an amateur radio license. Or you must desolder the antenna and replace it with a dummy load (a 51Ω, at least 0.6 W, metal‑film, low‑inductance resistor, soldered to the board with the shortest possible leads).

Finding a sonde in practice
In the simplest case, you can search by walking around the coordinates found on the internet. You need good eyesight, and binoculars can help too (30×8 is suitable; stronger isn’t needed because it’s tiring to hold and has a small field of view). The GPS coordinate decoded at the lowest altitude is the most accurate. If the sonde was last received and decoded near the ground (100–200 m), it will be nearby. If you only have data from 1000–1500 m altitude, it may have drifted several hundred meters from there, especially in windy weather. It’s worth studying where the sonde came from and where it might have drifted. Tracker predictions are sometimes surprisingly good; other times completely wrong.
Sometimes sondes follow the direction nicely; other times, in the last meters they unexpectedly change direction and “turn in.” The reason is that in the lowest 100–500 meters of the atmosphere, the so‑called planetary boundary layer, wind behavior changes radically. While aloft wind direction and speed are relatively uniform (geostrophic wind), near the ground terrain objects (mountains, forests, buildings) create friction. According to the laws of physics, friction causes the wind direction to gradually rotate as you approach the surface (in the Northern Hemisphere counter‑clockwise — the Ekman spiral). This causes the characteristic “turn‑in.” In addition, local flows (turbulence at a forest edge or tree line, or rising warm thermals above a motorway) can push the sonde off its previous path.
Near the ground, GPS signals can reflect from terrain objects, which can slow and degrade positioning accuracy. As a result, software may “think” the sonde suddenly turned or “jumped,” even though only the measurement error increased. Most experienced hunters therefore don’t look only at the last measured point: they also consider earlier data, descent rate, and the last reliable wind vector.
If you have a radio receiver, set it to the frequency shown by the tracker (or confirmed in a local community). Many launch stations often use the same frequency/frequencies, but this can change — so it’s worth checking the frequency before a specific hunt.
You could also search with a handheld radio and rubber‑duck antenna, watching for the strongest signal. This can be difficult within 50–100 m of the sonde because the signal seems to come from everywhere. In built‑up areas, among houses, VHF/UHF signals bounce around, making it almost hopeless. In open terrain, however, a useful trick is: once you have the signal, hold the radio tightly in front of you and rotate. When the signal is weakest (because your body blocks it), the direction is exactly behind you. Taking measurements from two points, you can estimate the location by forward intersection. For this trick it helps to set the radio to AM (if possible) and turn off squelch.
A rubber‑duck antenna is not directional; by itself it receives equally from all directions. If you have a direction‑sensitive antenna (e.g. Yagi, Moxon ) you can take bearings. With traditional direction‑finding receivers (used by radio amateurs or ARDF practitioners) it is hard to cope in the immediate vicinity. A Time Difference of Arrival (TDOA) direction‑finding receiver, however, can be used from 40–50 km just as well as from 10 meters.
Searching is most effective as follows:
- On online tracking sites, check the launch time and the expected landing time and place. Be careful: predictions are quite imprecise — even on a “short” 30–50 km flight the error between predicted and actual landing location can be several kilometers; on a longer, say 200 km journey, it can be tens of kilometers. Still, it’s worth studying the expected landing area and preparing. For example, if it’s expected to land in a swamp, wait and only set off once it’s possible it won’t land there after all. If it’s expected to land in a large lake (e.g. Lake Balaton), either get a motorboat or forget it.
- After launch, follow the sonde, and if it is heading the right way you can go after it. Often there are no roads to the landing location; the last few hundred meters — or even kilometers — must be walked. For planning, hiking maps, OpenStreetMap Hicking, Google Earth, Locus, etc. are very helpful.
- Near the target, take out the radio and listen. If you can hear the signal, you’re in the right place and the sonde is still there — another hunter hasn’t taken it and it hasn’t been lost. You can try to take a bearing, or decode the signal and find it by GPS coordinates.
Field decoding is a bit different from doing it at home. Working with a notebook in the field isn’t ideal; the laptop may suffer (unless you have a shock‑/rain‑/dust‑resistant “field laptop”). If you have an OTG cable (and an OTG‑capable phone), you can do it with an SDR stick. SDRangel has a mobile version that works perfectly for this, but without an amplifier a better antenna helps: with a rubber‑duck antenna you may only have a usable signal from 50–100 meters, because the RTL‑SDR by itself isn’t really sensitive.
You can transfer the decoded coordinates into, say, Locus or a Garmin handheld GPS, and from that point the fun is the same as geocaching.
The most comfortable and fastest option is to have a dedicated sonde‑finding instrument. With that, searching really becomes child’s play. You start the MySondy Go app on your phone, which connects to the gadget over Bluetooth. On the phone you can set the frequency, and if reception is successful, the coordinates appear both on the gadget’s display and on the phone. The app also provides a map/satellite view. The sonde is found within a few meters of the indicated point. You can arm the device already as you approach the landing area, and if you’re lucky and you arrive on time in a good spot, you can even see when the sonde comes down.

Useful tips
You may need a pocketknife to cut the sonde off the balloon string. The string is very strong; don’t try to tear it, because it won’t work — and it can cut your hand.
If the sonde gets stuck in a tree, a 7–10 meter fishing rod with a hook on the end can help. If there’s no other way, you can even attach a blade to the end to cut the sonde free.
An ultrasonic dog repeller can also be useful, and tick‑repellent spray is practically mandatory. You should also assume that it may get dark during the search or you may get stuck out in the field after dark (e.g. due to an accident), so always carry a light. A mobile phone flashlight is not a substitute for a headlamp!
For field searching, long pants, a long‑sleeved shirt, and boots are recommended, because in scrubby terrain vegetation will quickly scratch bare skin. In summer, a visor cap and sunglasses are useful; in winter, gaiters and gloves. Always have enough drinking water and a basic first‑aid kit — if nothing else, at least in the car.
Dirt roads are often impassable in winter or after rain, and in summer at best just dusty. If you leave paved roads, even the best‑case outcome of a sonde hunt ends with a thorough car wash. What’s more, you can’t always turn around on these roads, it’s easy to get stuck, and the landowner isn’t always happy about you driving in.
Sondes sometimes get caught on high‑voltage power lines. Although the plastic string theoretically does not conduct electricity when dry, it can be wet. Trying to knock down or pull off a sonde hanging on a power line is life‑threatening! Leave such a sonde hanging — unless you want firefighters to collect what’s left of you.
Respect private property and restricted areas. If the sonde fell on private property, find the owner or their representative (e.g. a guard) and explain what you are looking for and what you want. People are usually very cooperative, helpful, and curious. Gauge their level of science literacy and explain accordingly. Show them the recovered sonde and say that these instruments greatly contribute to weather forecasting. They tend to like that — but the day’s evolution of the moist adiabat usually doesn’t interest them.
If you set off for a sonde, you can post it on a community wall (e.g. on radiosondy.info): you may even run into other hunters in the field. The important thing is that this is not mandatory, and there is no “official” site: posting is at most a courtesy gesture, not a reservation. Whoever gets there first gets the find. Of course it’s good to avoid pointless “rushing” and also malicious policing. The point: communicate politely and compete fairly.
Closing remarks
Weather radiosonde hunting is at once a radio‑amateur hobby, a data‑visualization exercise, living science, and a bit of sport. The “treasure hunt” part is there just as much as the engineering game: first you track the flight on a screen, then reality in the field (mud, fences, ditches, scrub) adds its own difficulties.
Perhaps the nicest part is that the chain is transparent end‑to‑end: you receive the signal, you decode the numbers, you plot the track, and finally you find the device. With a laptop, an SDR receiver, and an antenna, you can connect directly to the ocean of data from which tomorrow’s weather forecast is made — and when you hold the sonde in your hand, it suddenly becomes very concrete that “weather” is not an app, but physics above your head.
Sooner or later you’ll be interested in why the sonde initially follows the dry adiabat, and then from cloud base continues to rise along the moist adiabat. You’ll learn how to interpret a Skew‑T log‑P diagram. But that’s another story!